One of the most popular download on this site is how to convert USGS geopdf to geotiffs using ArcGIS. So I started to thinking about why not use the USGS Topo Vector Data to create seamless maps that are very similar to the USGS geopdfs? Why do I want to use the USGS Topo Vector Data to create topographic maps? Because it’s a hassle and a pain in neck to get USGS GeoPDFs into a GIS, and sometimes the web mapping services just don’t cut it (e.g. resolution not good enough, limited control over styling, etc.).
This post is a follow up post to the previous, USGS TNM Style Template ArcGIS. Data for Hawaii is now available to use with the ArcGIS map document template. I like the USGS TNM Topographic maps as basemaps – it provides an informative but clean background for whatever data layers I overlay on top of it and plus most people are familiar with it. If you are looking to recreate a USGS Topographic Quadrangle maps (7.5-Minute topo quads) in ArcGIS – I suggest you follow the instructions given on the USGS site. What I want is to assemble a statewide dataset for use with the TNM style template to create a seamless USGS topo maps. You should read the USGS FAQ on using the USGS TNM style template.
Step 1: Download Datasets and TNM Style Template
So, the first step is to download the datasets needed for Hawaii and the style template.
1. A good place to look for data is here: https://viewer.nationalmap.gov/basic/ or go directly to https://viewer.nationalmap.gov/tools/topotemplate/
First you should download the TNM Style template and Topo Map Vector Data GDBs for all the 7.5-Minute quads of interest. Here I have the Topo_TNM_Style Template which contains the ArcMap map document that will be used for the styling and map making later.

Also I have downloaded all the vector data by island. Make sure you download data as file geodatabases and not shapefiles. If you know what you're doing then you can go directly to the Cloud Browse FTP site and download what you need. Unfortunately the listing of staged vector data doesn't include Hawaii so I have use the data download service instead.
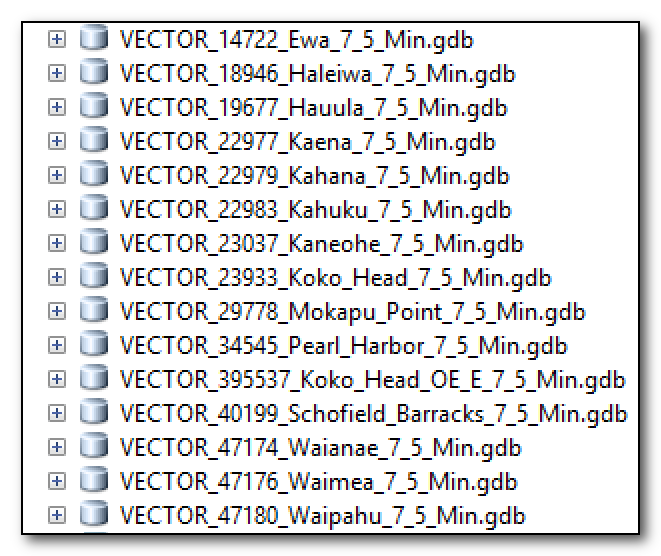
Topo Vector Data for 7.5-Minute cells for Oahu
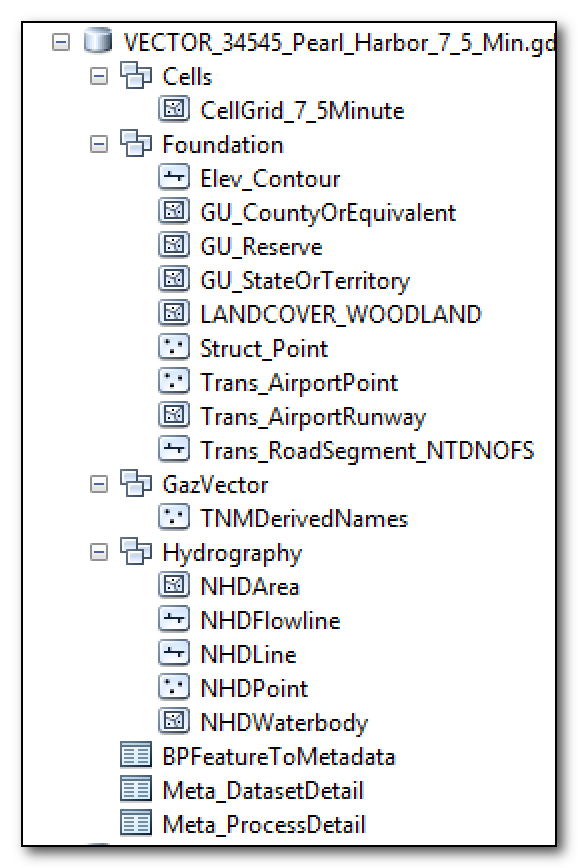
If you look at the topo vector data GDB file you'll see that it contains the following data - shown below is a example for Pearl Harbor quad, but all the GDBs should contains the same datasets. Using this as a reference I'm going to download the statewide (Hawaii) equivalents to created my Statewide Topo Vector Data GDB.
You will need to download the following datasets:

GOVTUNIT_Hawaii_State_GDB.gdb - file GDB containing boundary layers for Hawaii
MAPINDICES_Hawaii_State_GDB.gdb - file GDB containing map indices for Hawaii. You'll want to use the 7.5-Minute map index
NHD_H_Hawaii_GDB.gdb - file GDB containing the National Hydro Dataset for Hawaii
STRUCT_Hawaii_State.GDB.gdb - file GDB containing point structures for Hawaii
TRAN_15_Hawaii_GU_STATEORTERRITORY.gdb - file GDB containing transportation layers for Hawaii
WOODLAND_15_Hawaii_GU_STATEORTERRITORY.gdb - file GDB containing woodland land use for Hawaii
For the Elevation Data - you can download the contour data directly from the Cloud Browse FTP site or use the Download GIS Data web service. Here I am using the data download service.

Step 2: Create an empty geodatabase schema
So after downloading the data I need, I going to create an empty geodatabase schema based on one of the Vector Data Quad GDB (e.g. Vector_34545_Pearl_Harbor_7_5_Min.gdb). I'm going to then load the statewide datasets into this new GDB and this will be my new Topo Vector Data GDB for Hawaii.
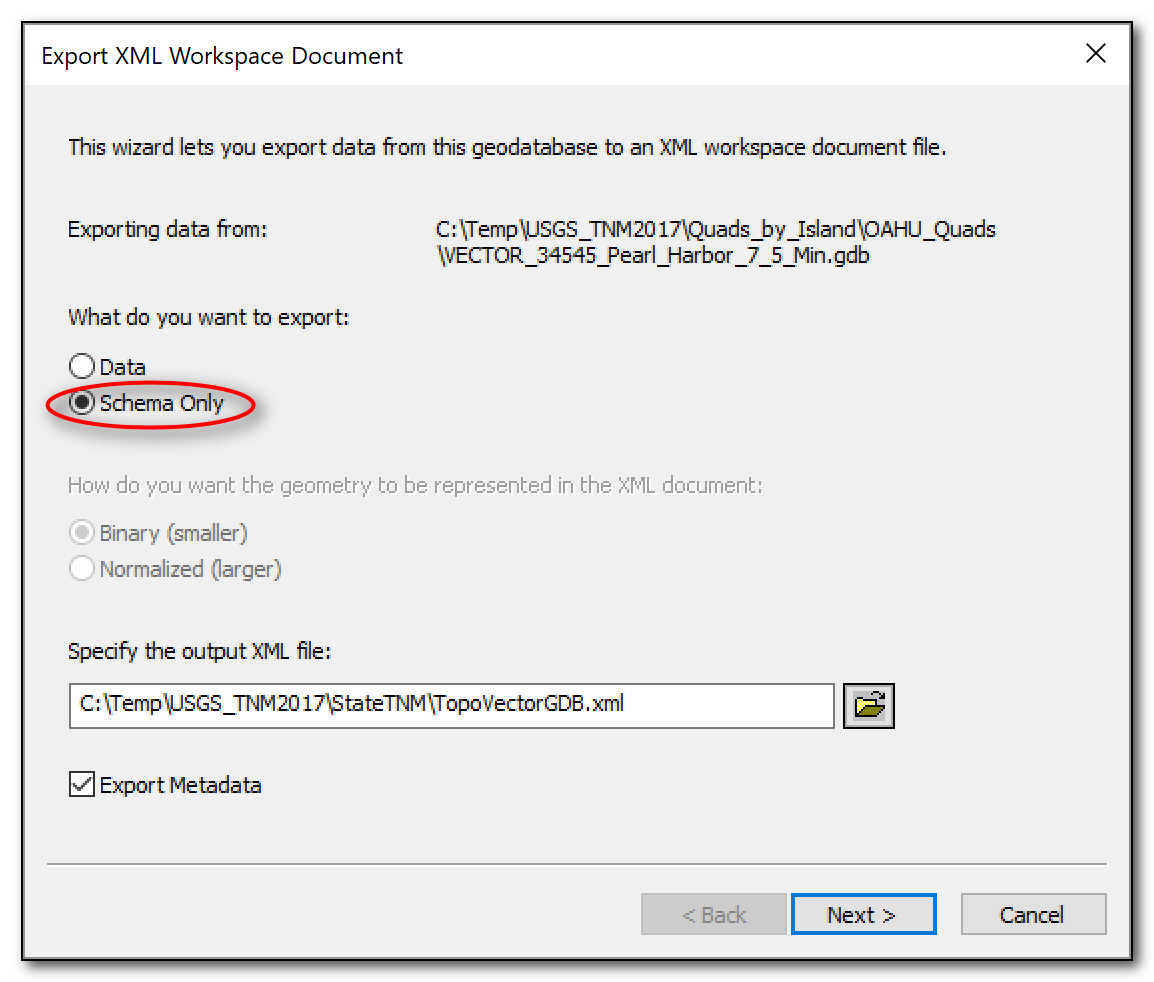
Export existing Vector_xxx_7_5_Min.gdb schema
1. In ArcCatalog, right click on the Vector_xxx_7_5_Min.gdb >> Export >> XML Workspace Document
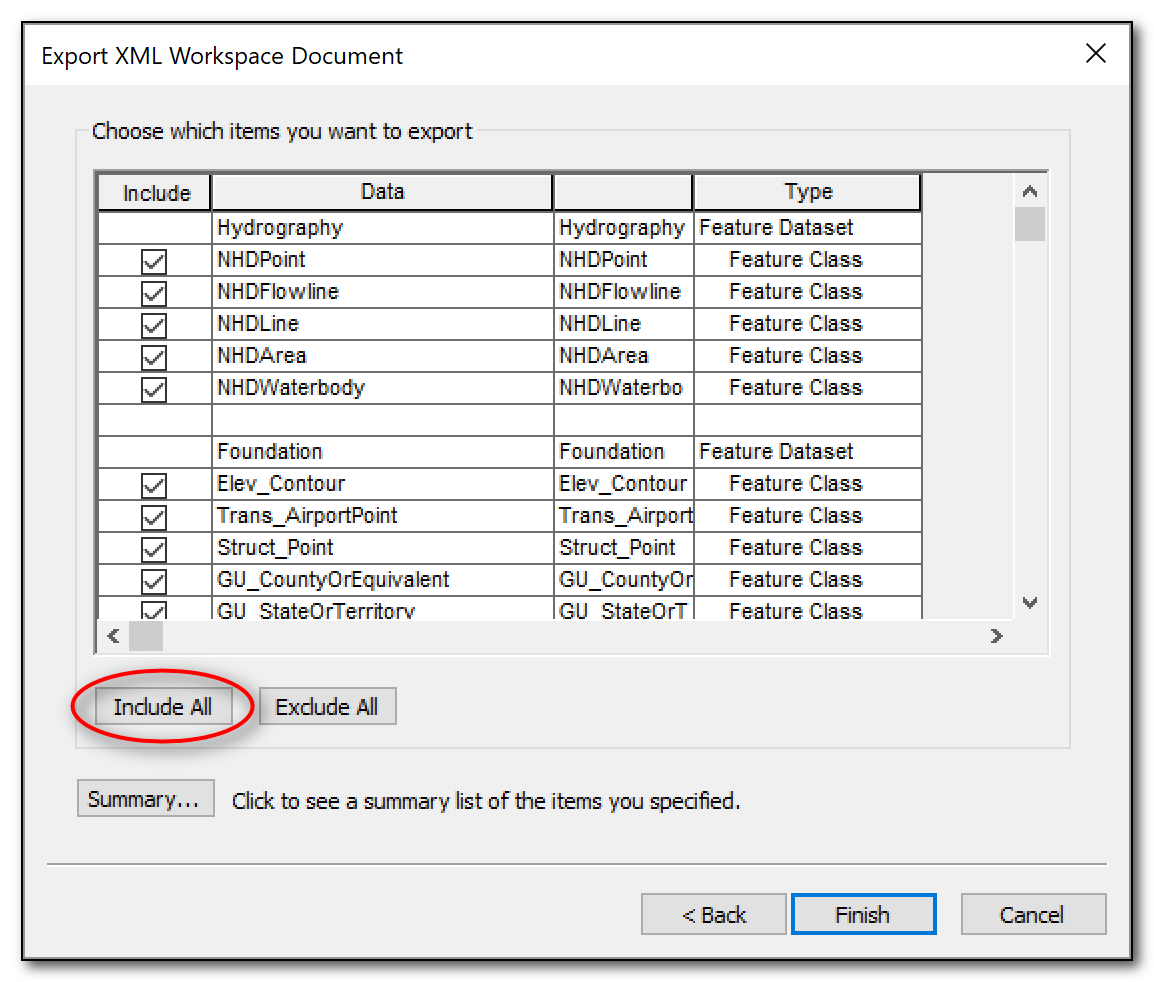
2. In the Export XML Workspace window: Select only the schema to export and give the output xml a name. Click Next and make sure you Select all features to included in the export
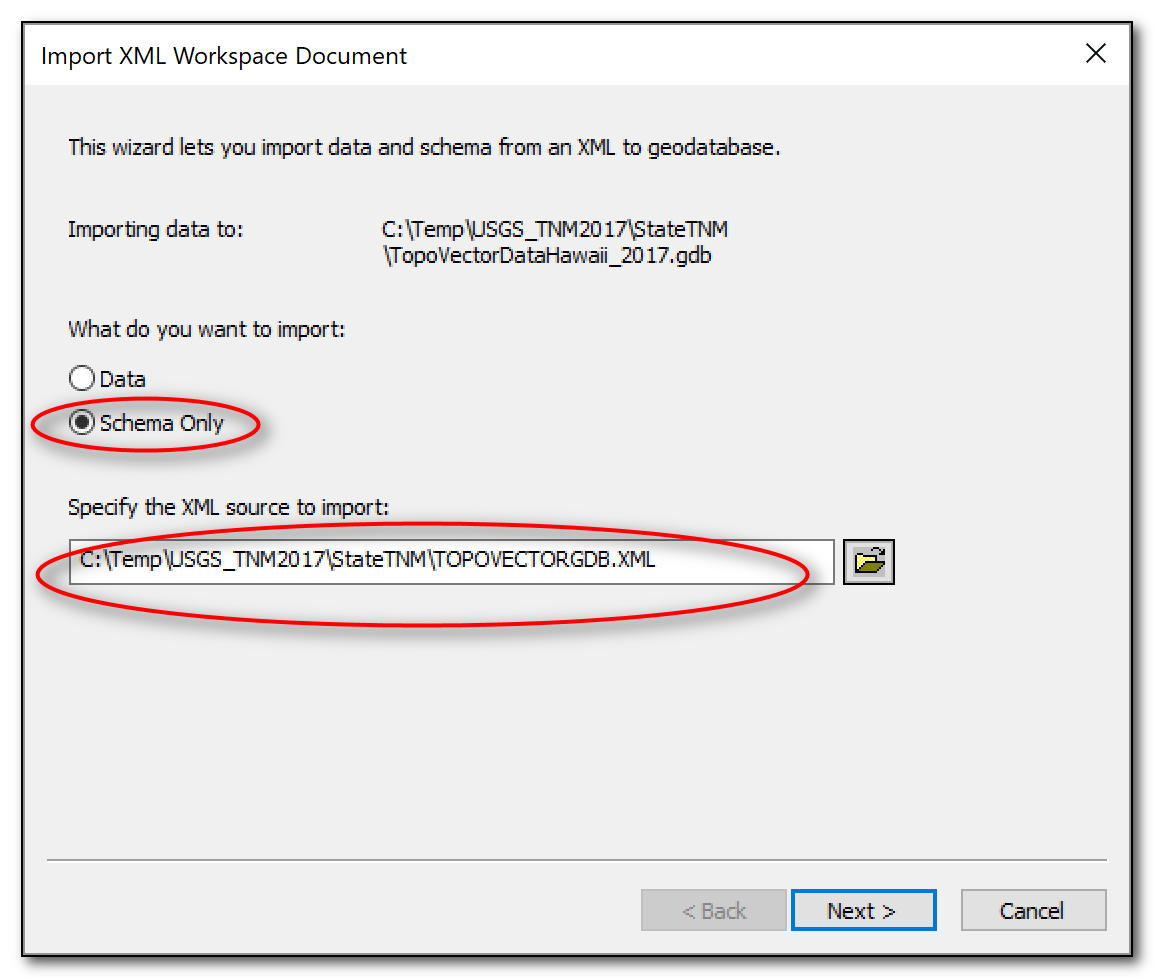
Create a new file geodatabase with existing schema
1. In ArcCatalog, create a new file geodatabase then import the existing XML schema your exported previously (Right click on file GDB >> Import >> XML Workspace Document)
2. In the Import XML Workspacec Document, select to import only the schema
Step 3: Load Data into the New Statewide GDB
1. You should now have an empty file GDB with the proper schema to load data into.
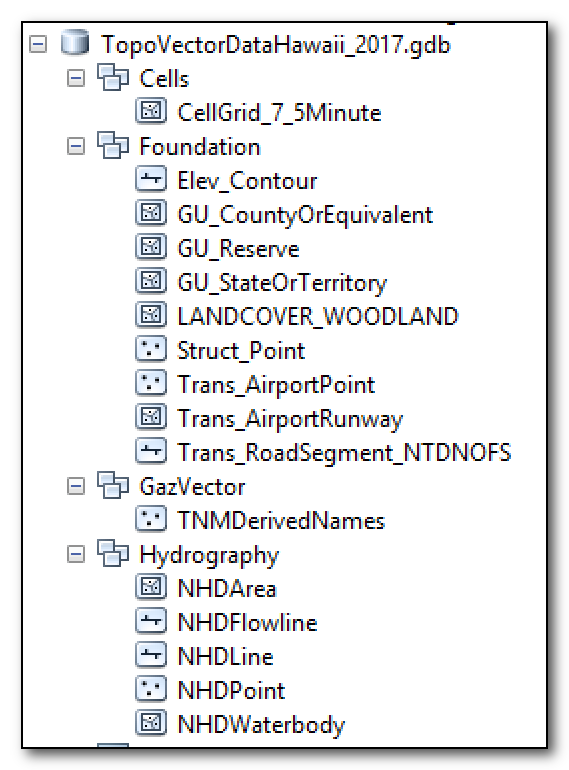
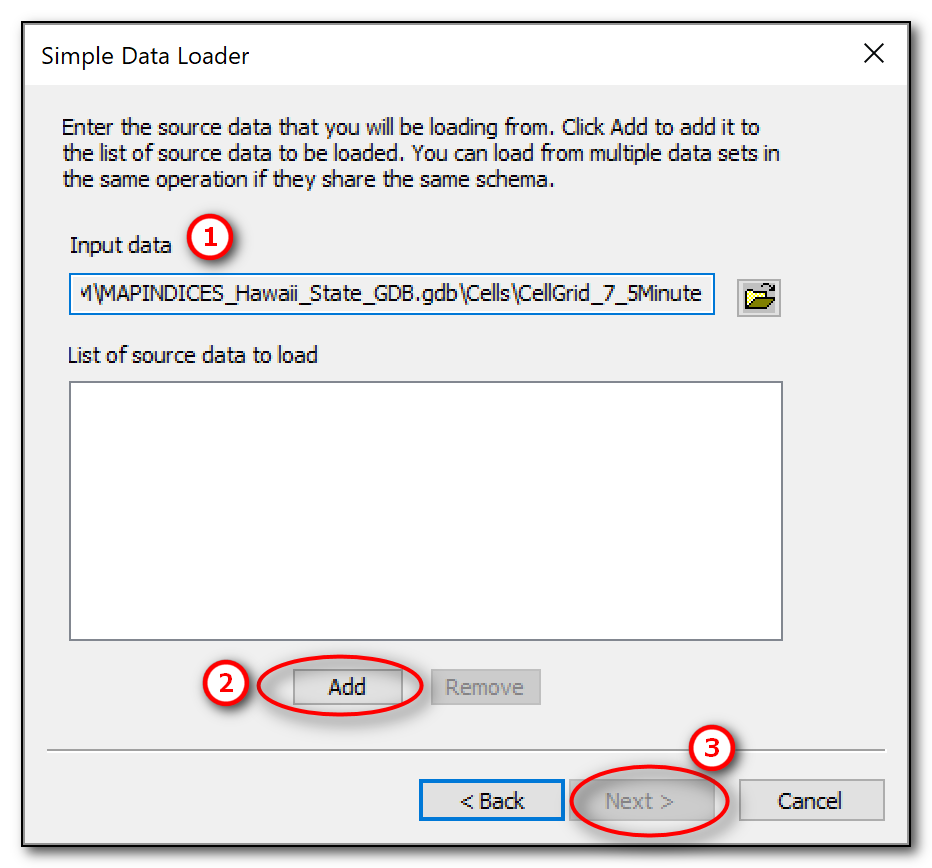
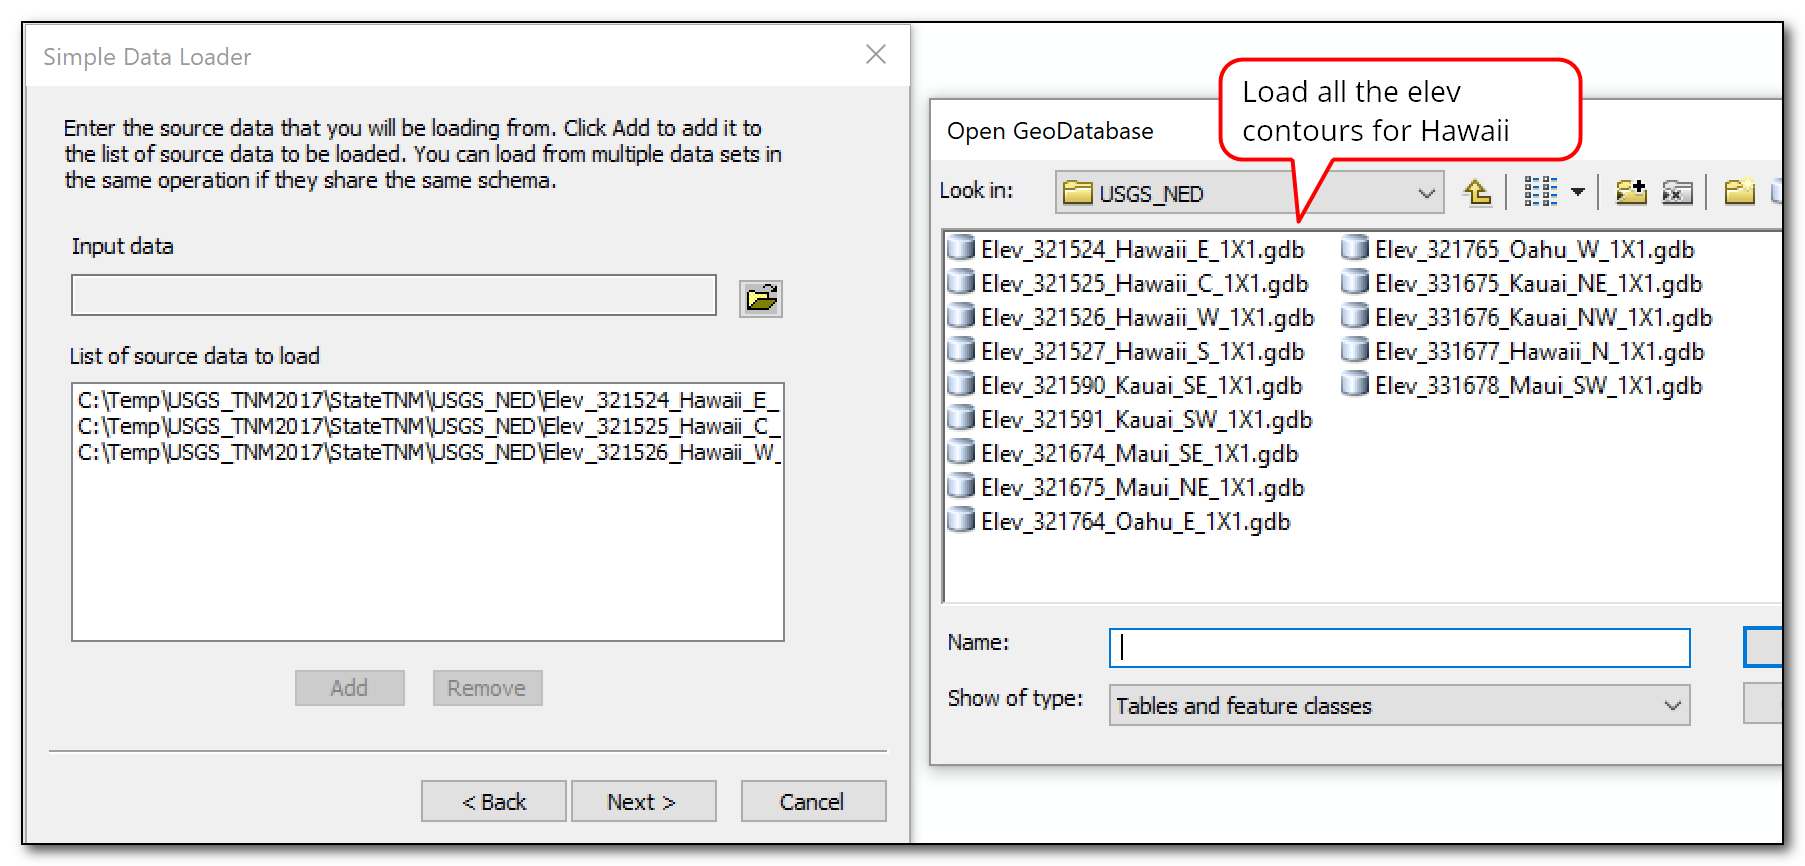
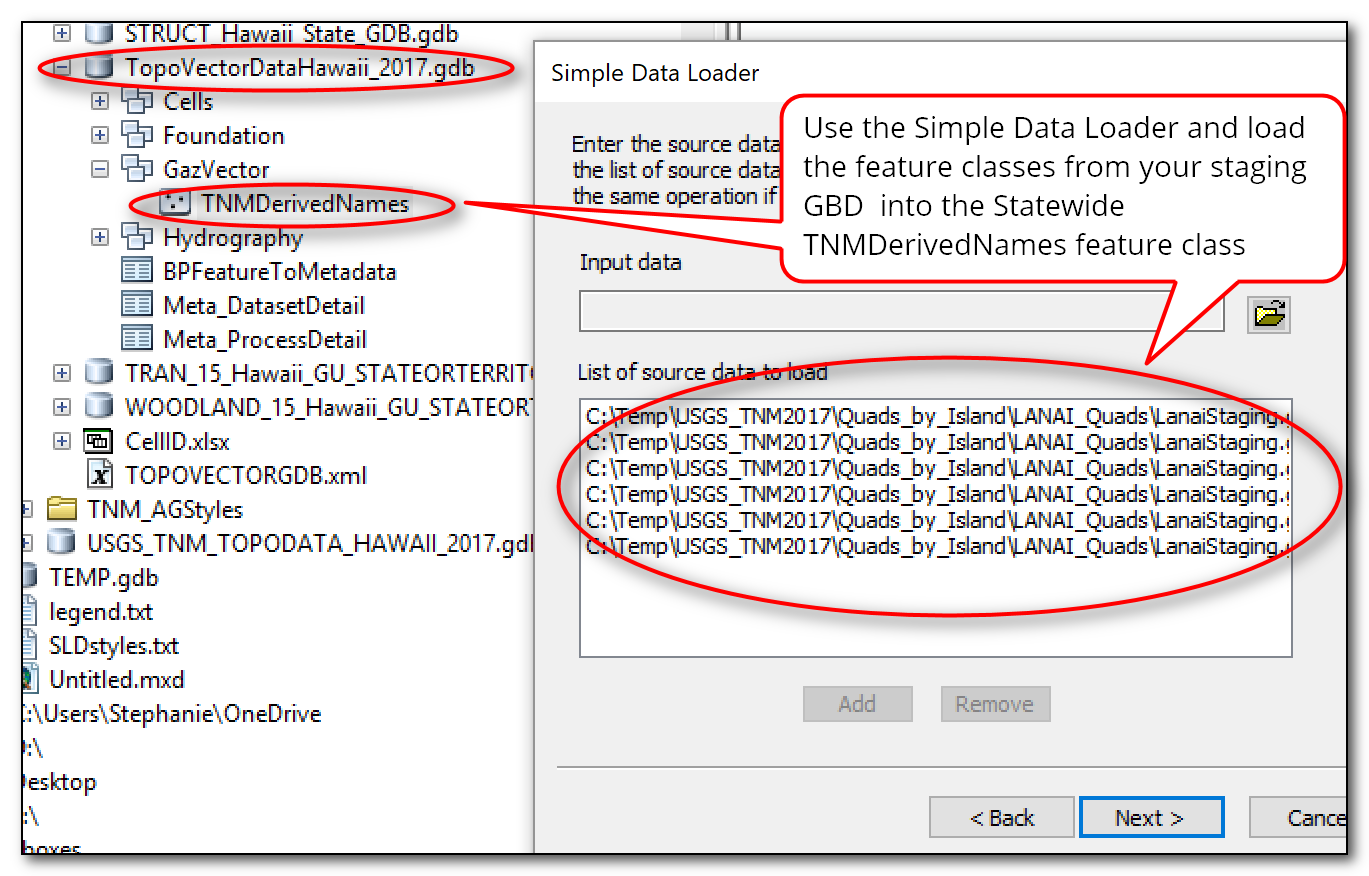
2. In ArcCatalog start loading the corresponding statewide data into the correct feature classes. For example, here I'm going to load the features from my MAPINDICES_Hawaii_State_GDB.gdb\Cells\CellGrid_7_5Minute layer into the corresponding TopoVectorDataHawaii_2017.gdb\CELLS\CellGrid_7_5Minute layer. Right click on the feature class for which you want to load features into >> Load >> Load Data. In the Simple Data Loader window: input your parameters.
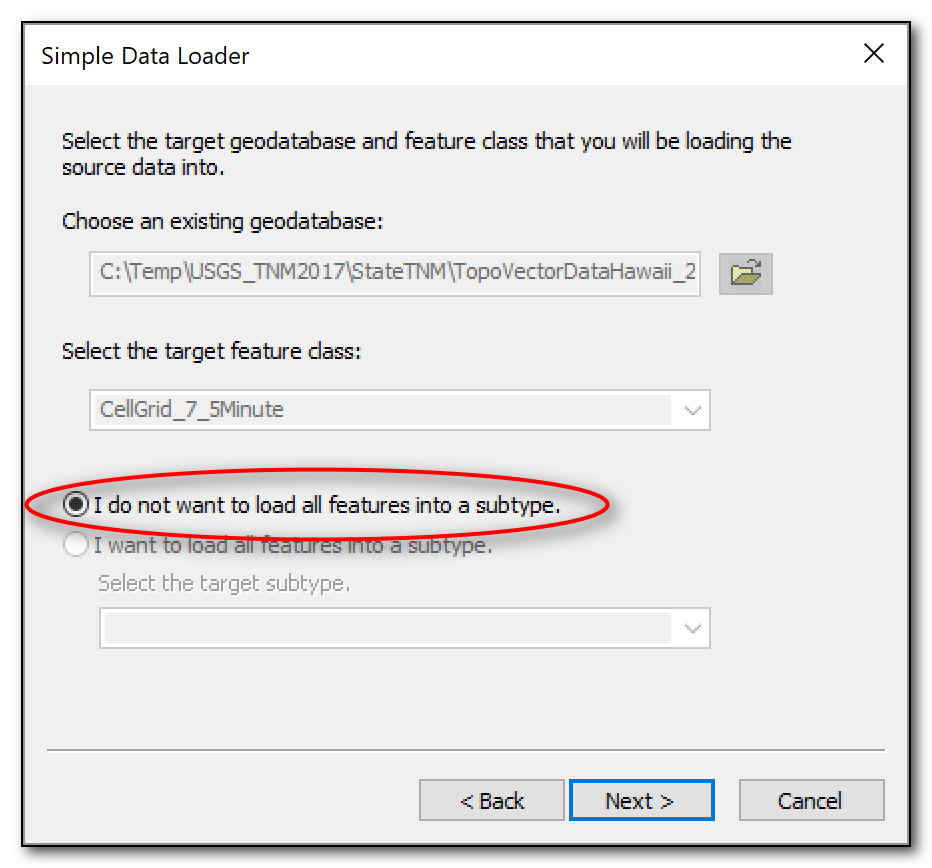
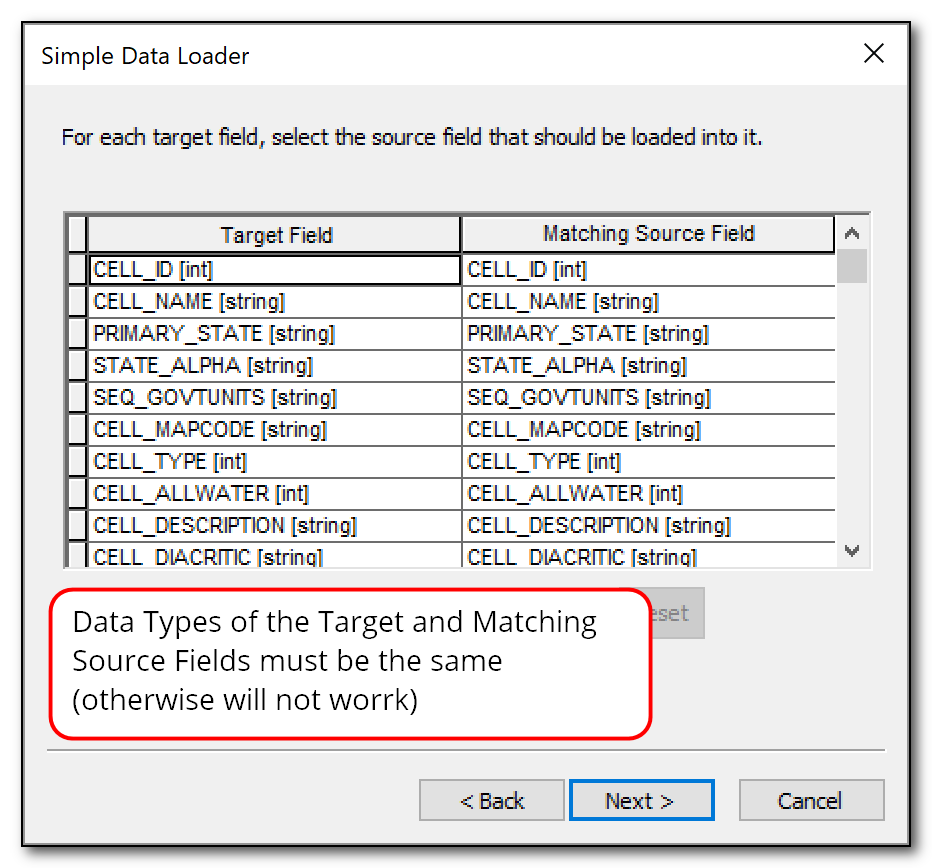
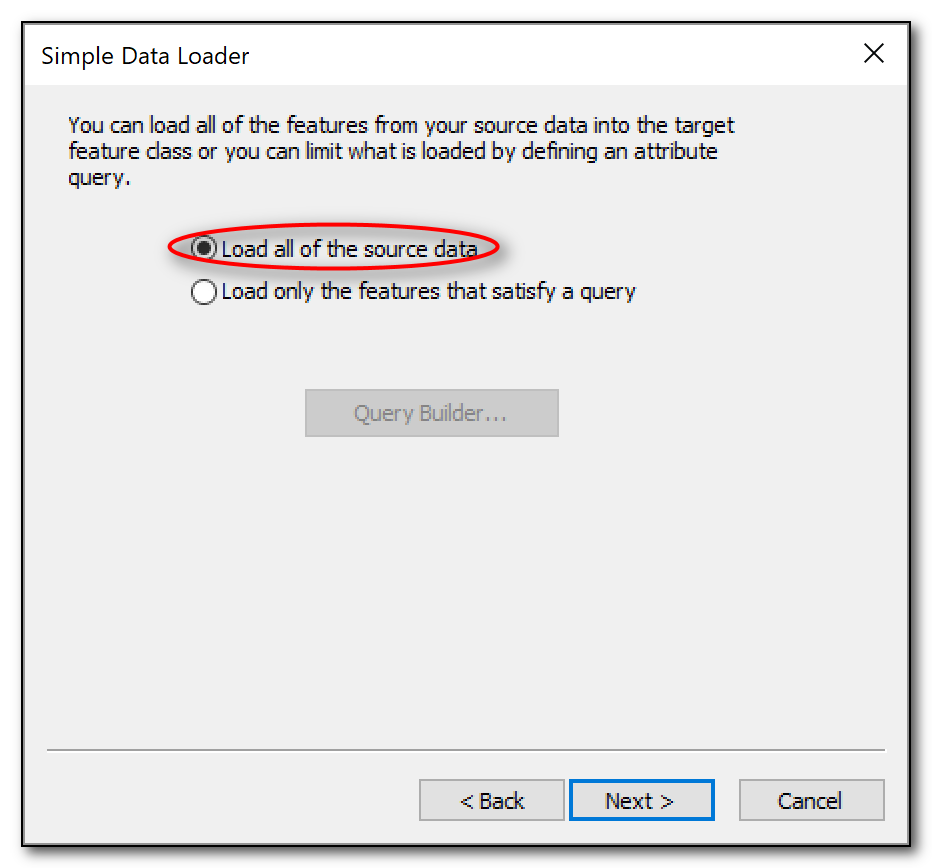
3. Use the Simple Loader method to load features into all the corresponding feature classes - exceptions below. You can load features from multiple layers -- see example below for elev_contours.
Note: For Transportation Road features the Target Fields and Matching Source Fields will not all match (some Source Fields will be blank or None) - this should be ok since the fields for display (TNMFRC) and label (FULL_STREET_NAME) match. Also the TNMDerivedNames feature class does not have a statewide equivalent (explained further below) - follow Step 3A below for a work around solution.
Step 3A: Batch Selecting and Merging TNM Derived Names Points
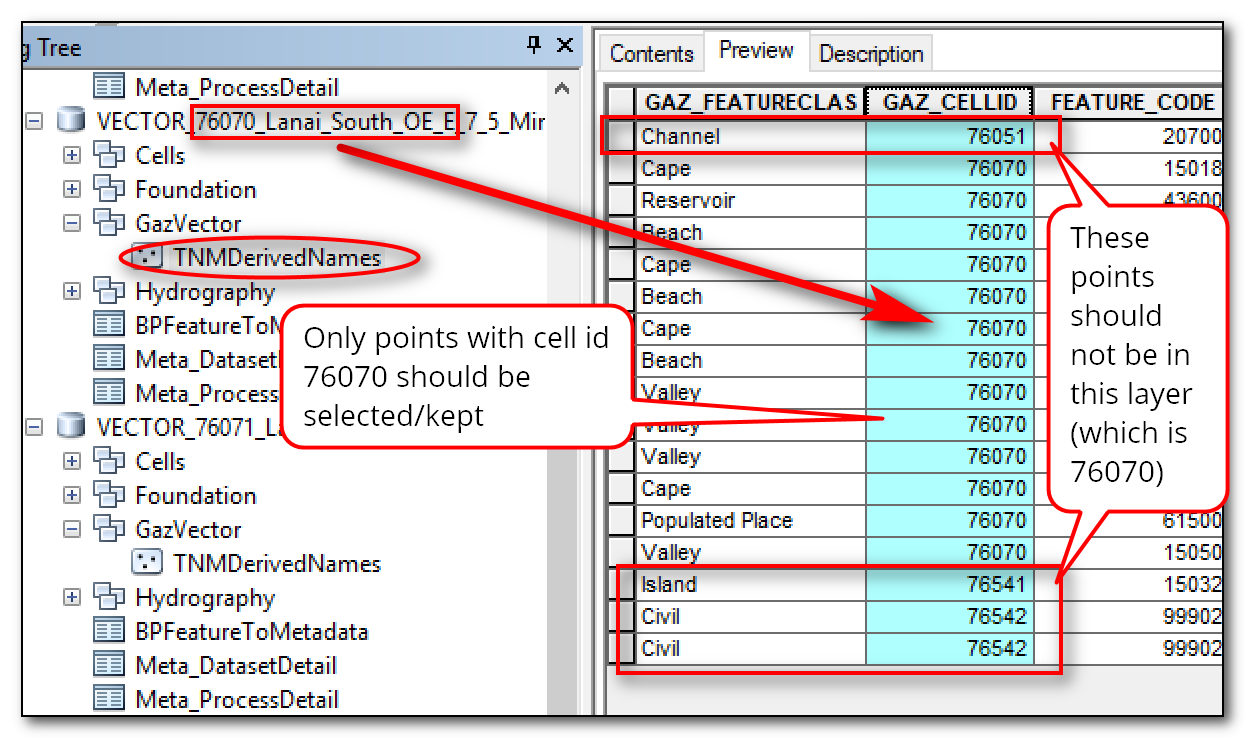
The USGS TNM Style guide says that "TNM Derived Names is a filtered and enriched dataset intended specifically to be used for labeling named features. TNM Derived Names data are provided only in conjunction with Topo Map Vector Data products." So there are no national or statewide data for TNMDerivedNames layer - you'll have to merged all the points from each of the Vector Quad GDB. Note that you can't just merged the points together because a quad can contain points for other adjacent quads as well so you'll end up having duplicates if you don't filter them first. What you'll need to do is select only the points in the quad of interest then do the merge so the resulting layer won't contain duplicates (see example image below:
Batch Selecting TNM Derived Names Points of Interest
The example shown here is batch selecting features for all 6 quads for Lanai.
1. Create a new file GDB for the data staging (e.g. LanaiStaging.gdb)
2. In ArcToolbox, go to Analysis Tools >> Extract >> Right click on Select >> Batch
3. In the Batch Select grid: (there are 6 quad cells so there should be 6 output feature classes)
Input Features: TNMDerivedNames layer from each quad
Setup your Environment settings to use your staging GDB as the Scratch Workspace (e.g. LanaiStaging.gdb)
Output Feature Class: Use the default or input a name
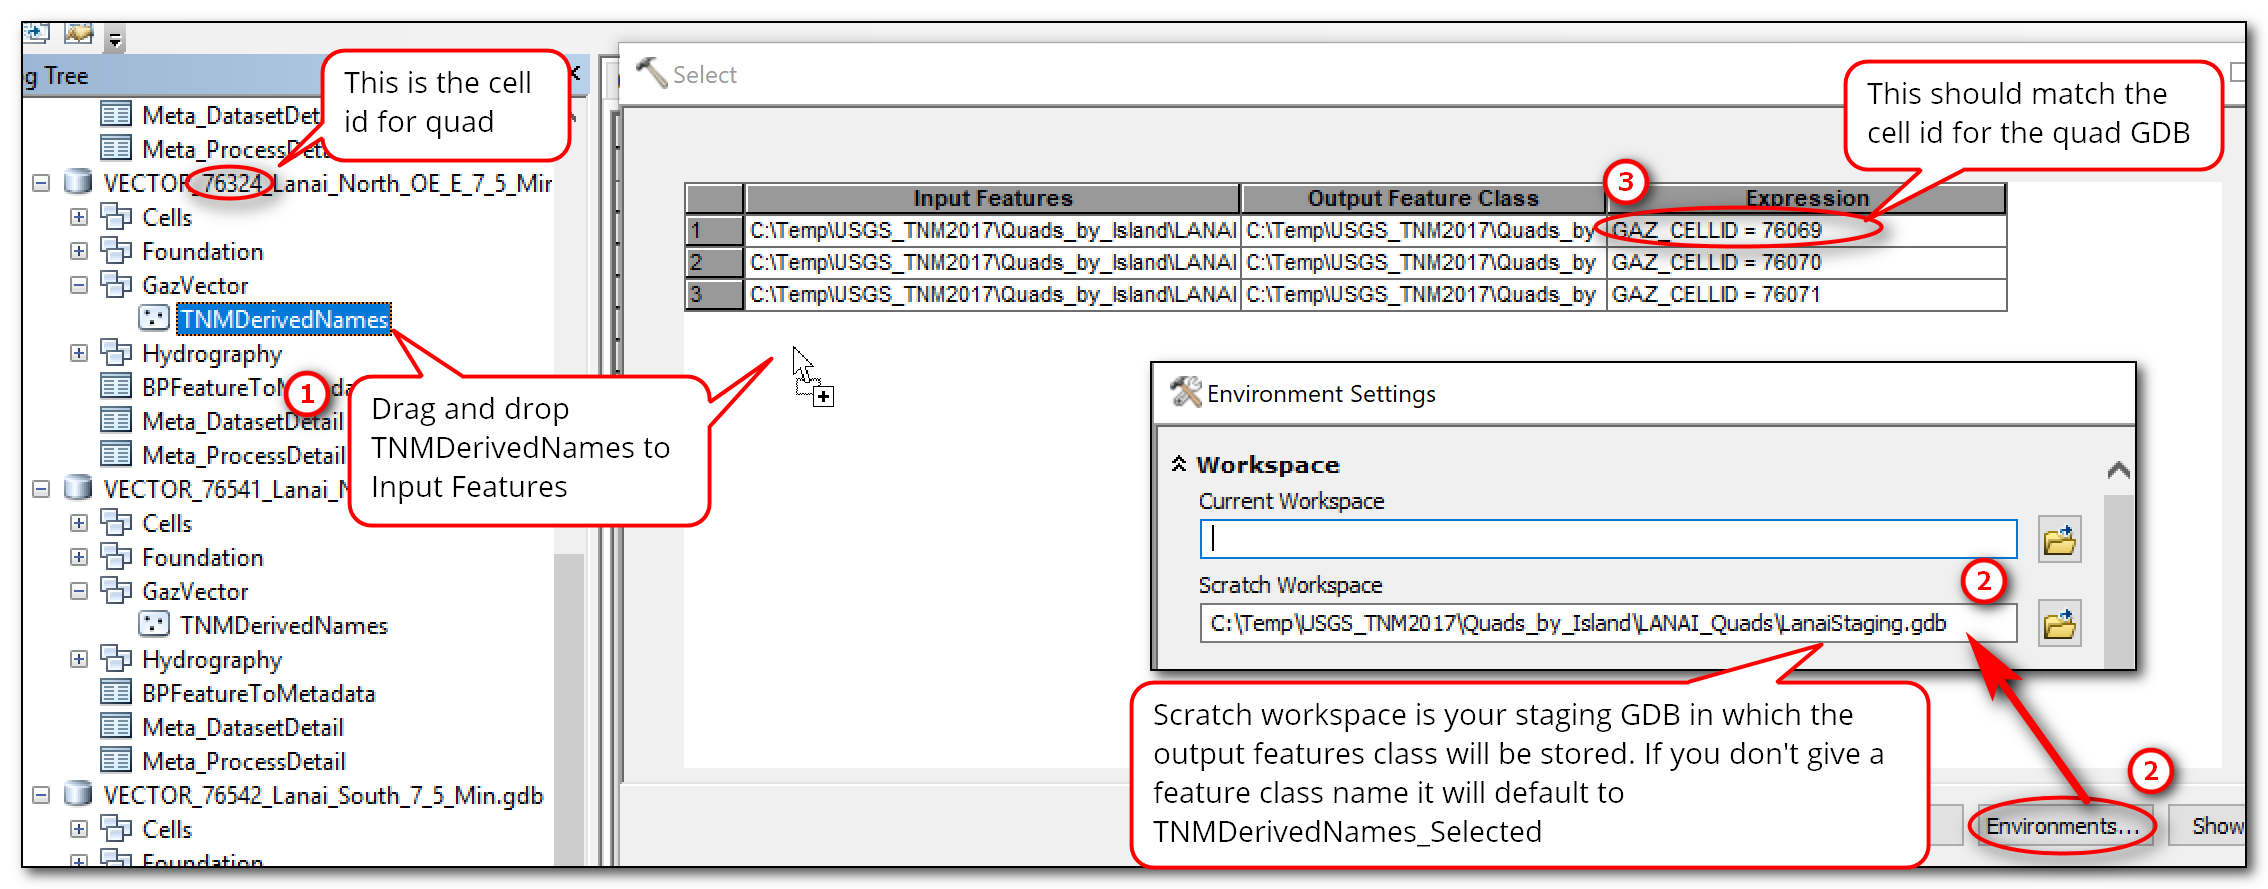
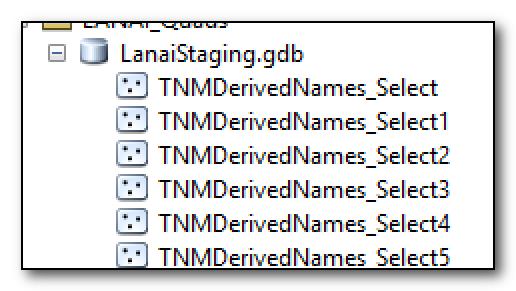
Here is an example for the LanaiStaging.gdb
Merging or Loading the TNMDerivedNames Output Feature Classes
After you are done with the batch feature selections, use the Simple Data Loader (right click on the target layer >> Load >> Load Data) to load in the features from your staging GDB into the TNMDerivedNames feature class. Alternatively you could also use the Merge Tool in ArcCatalog.
Once you are done with the merging or feature loading, you can then link the data sources in the TNM Style Template MXD.
Step 4: Linking Data Sources to TNM Style Template
1. Open the TNM Style Template map document (e.g. TopoTNMStyleTemplate_v10_0.mxd)
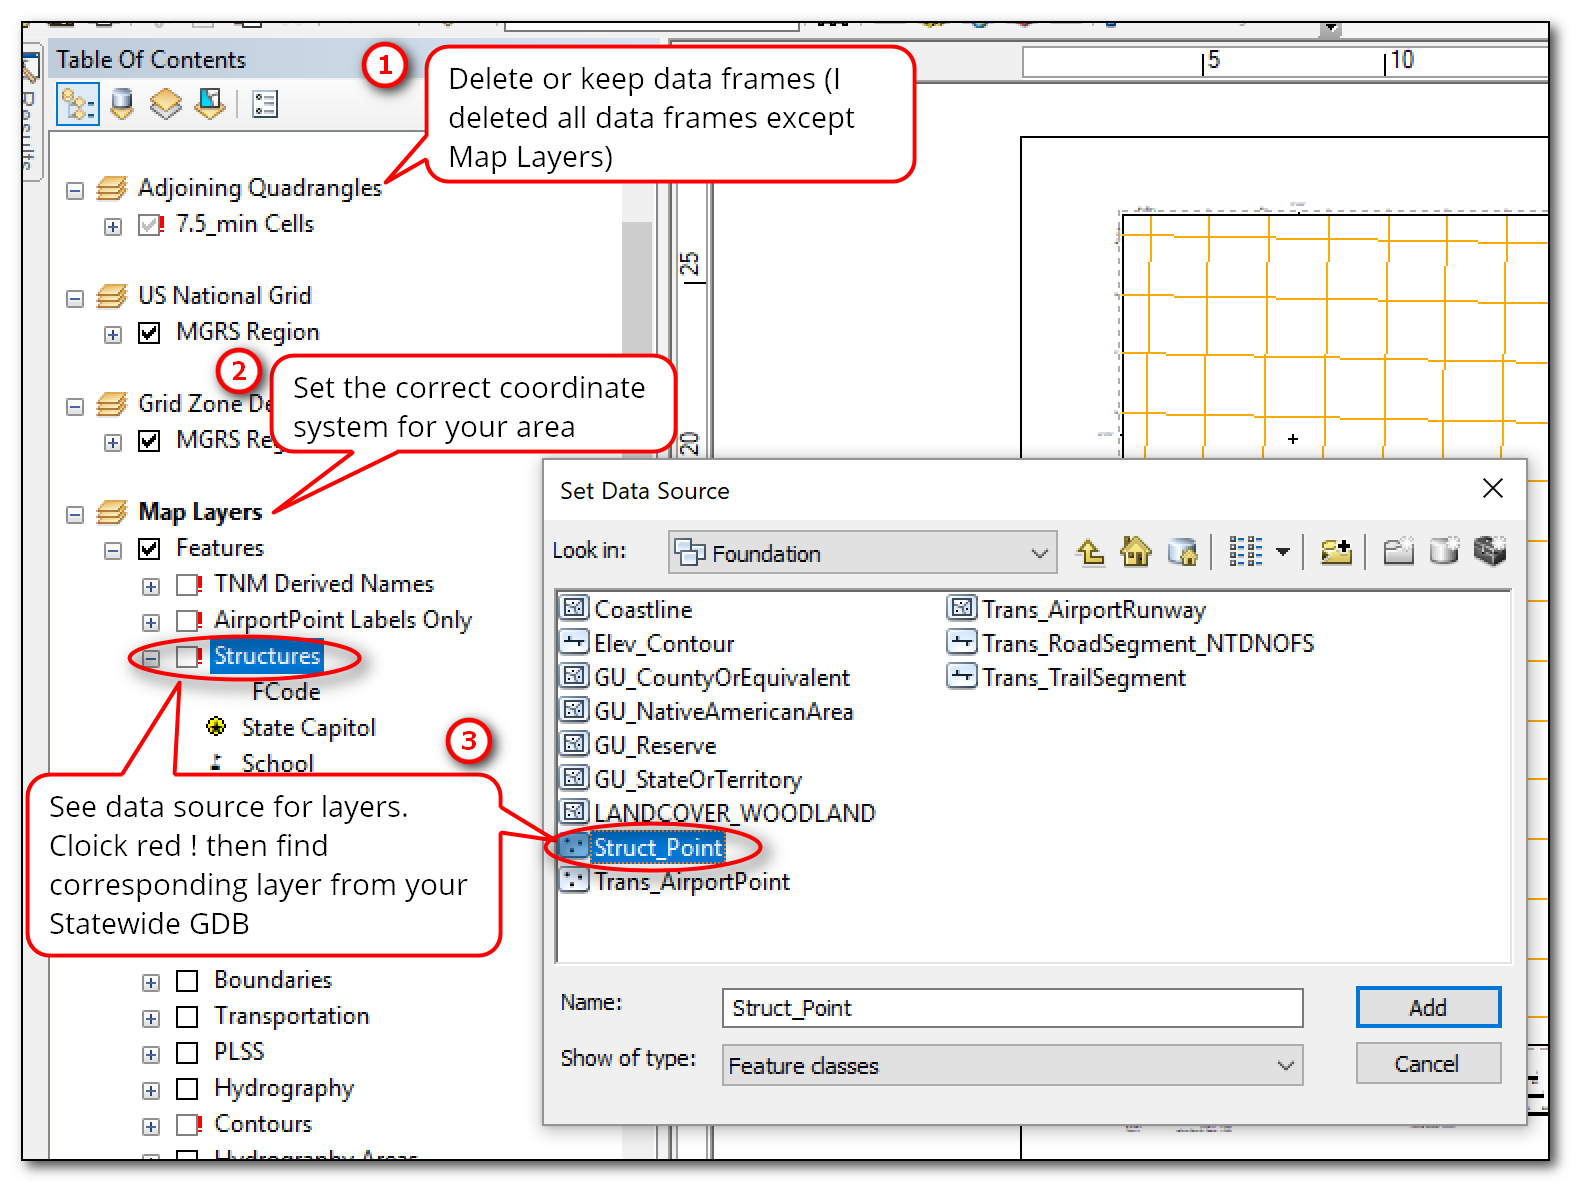
2. Modify the map document to fit your needs:
Delete data frames that you don't need - I only kept the Map Layers and Images Data Frames
Change the coordinate system of the Map Layers Data Frame
Set the Data Source links for layers with missing data links. Note PLSS does not exist for Hawaii.
Save a copy of the map document
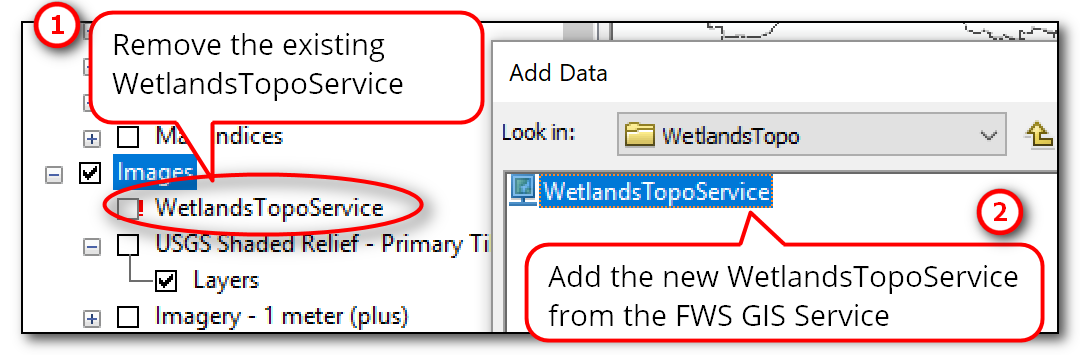
3. "Layers" under the Images Data Frame are web services. Note that the WetlandsTopoService needs fixing (exising URL to service is doesn't work).
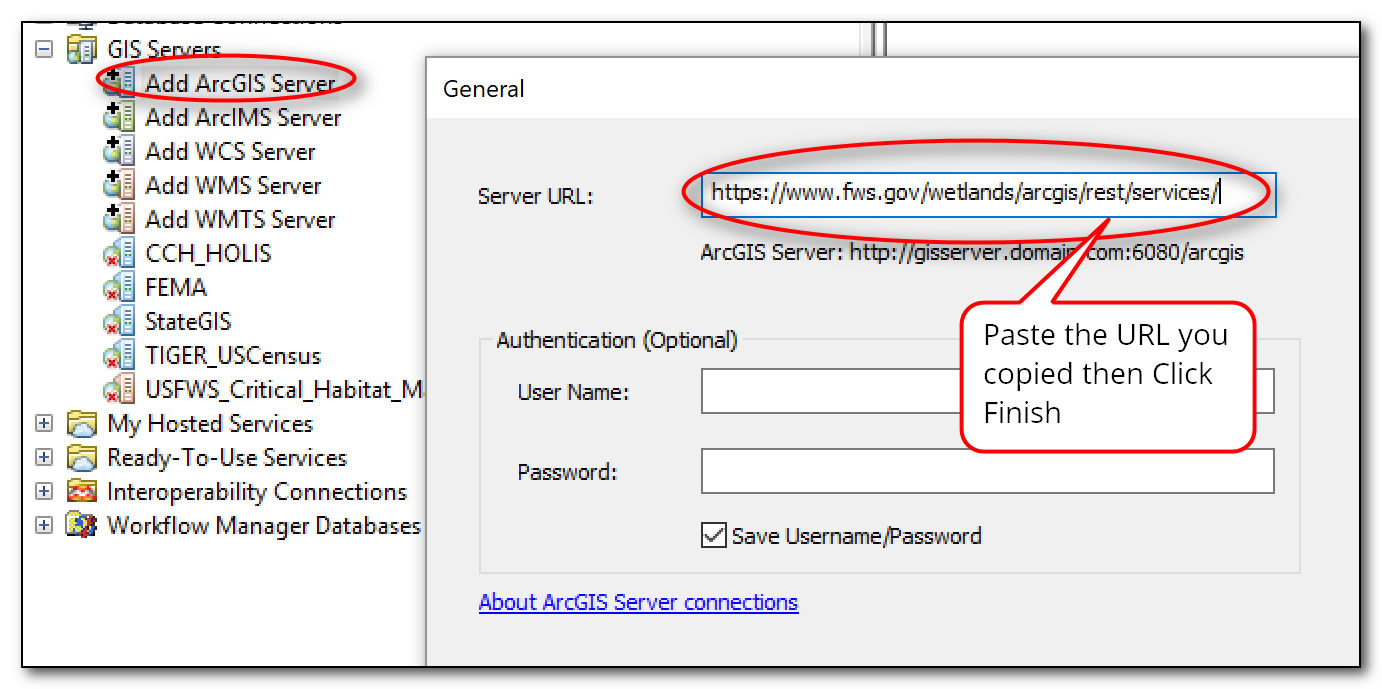
In a web browser, go to https://viewer.nationalmap.gov/services/ and scroll down to Themed Overlays >> FWS Wetlands - Topo Symbols >> Click on REST - this should open a new page to the REST service - copy this URL up to "...services/"

In ArcCatalog, add this web service. Go to GIS Servers >> Add ArcGIS Server. In the Add GIS Server window: select use GIS server >> Next. Then Paste the Server URL you copied and click Finish
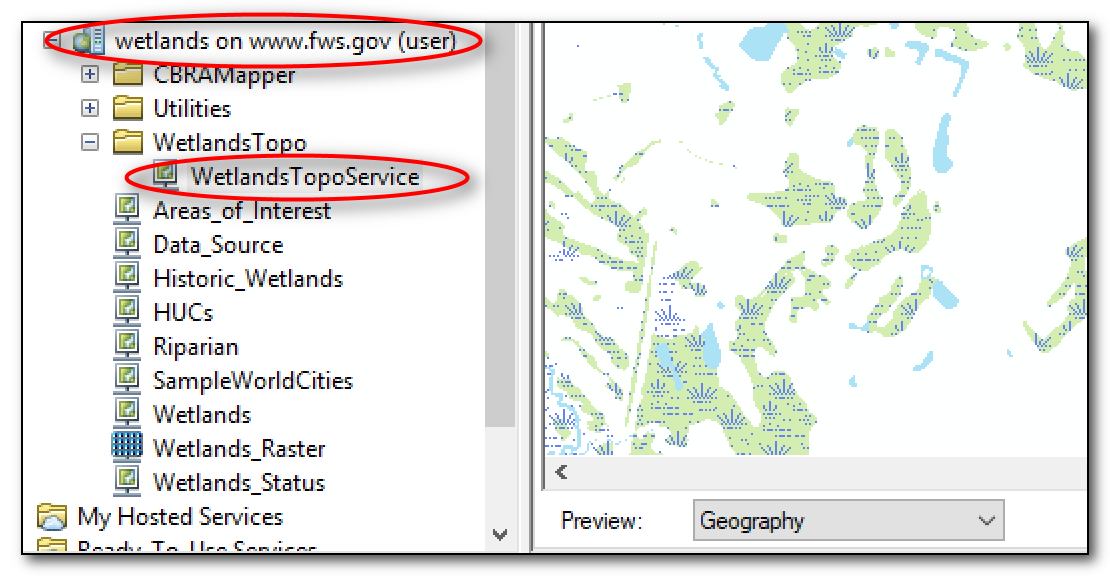
You should now have the FWS Wetlands Topo Services added to your GIS server in ArcCaalog - see below.
4. Back in the ArcMap document, what you have to do is remove the existing WetlandsTopoService then add it back in using the new FWS GIS Server. Note: Setting the data source/link to the existing WetlandsTopoService didn't seem to work for me - not sure why (I'm using ArcGIS Desktop 10.5.1).
5. Modify your map document and map layout to fit your needs. That's it.
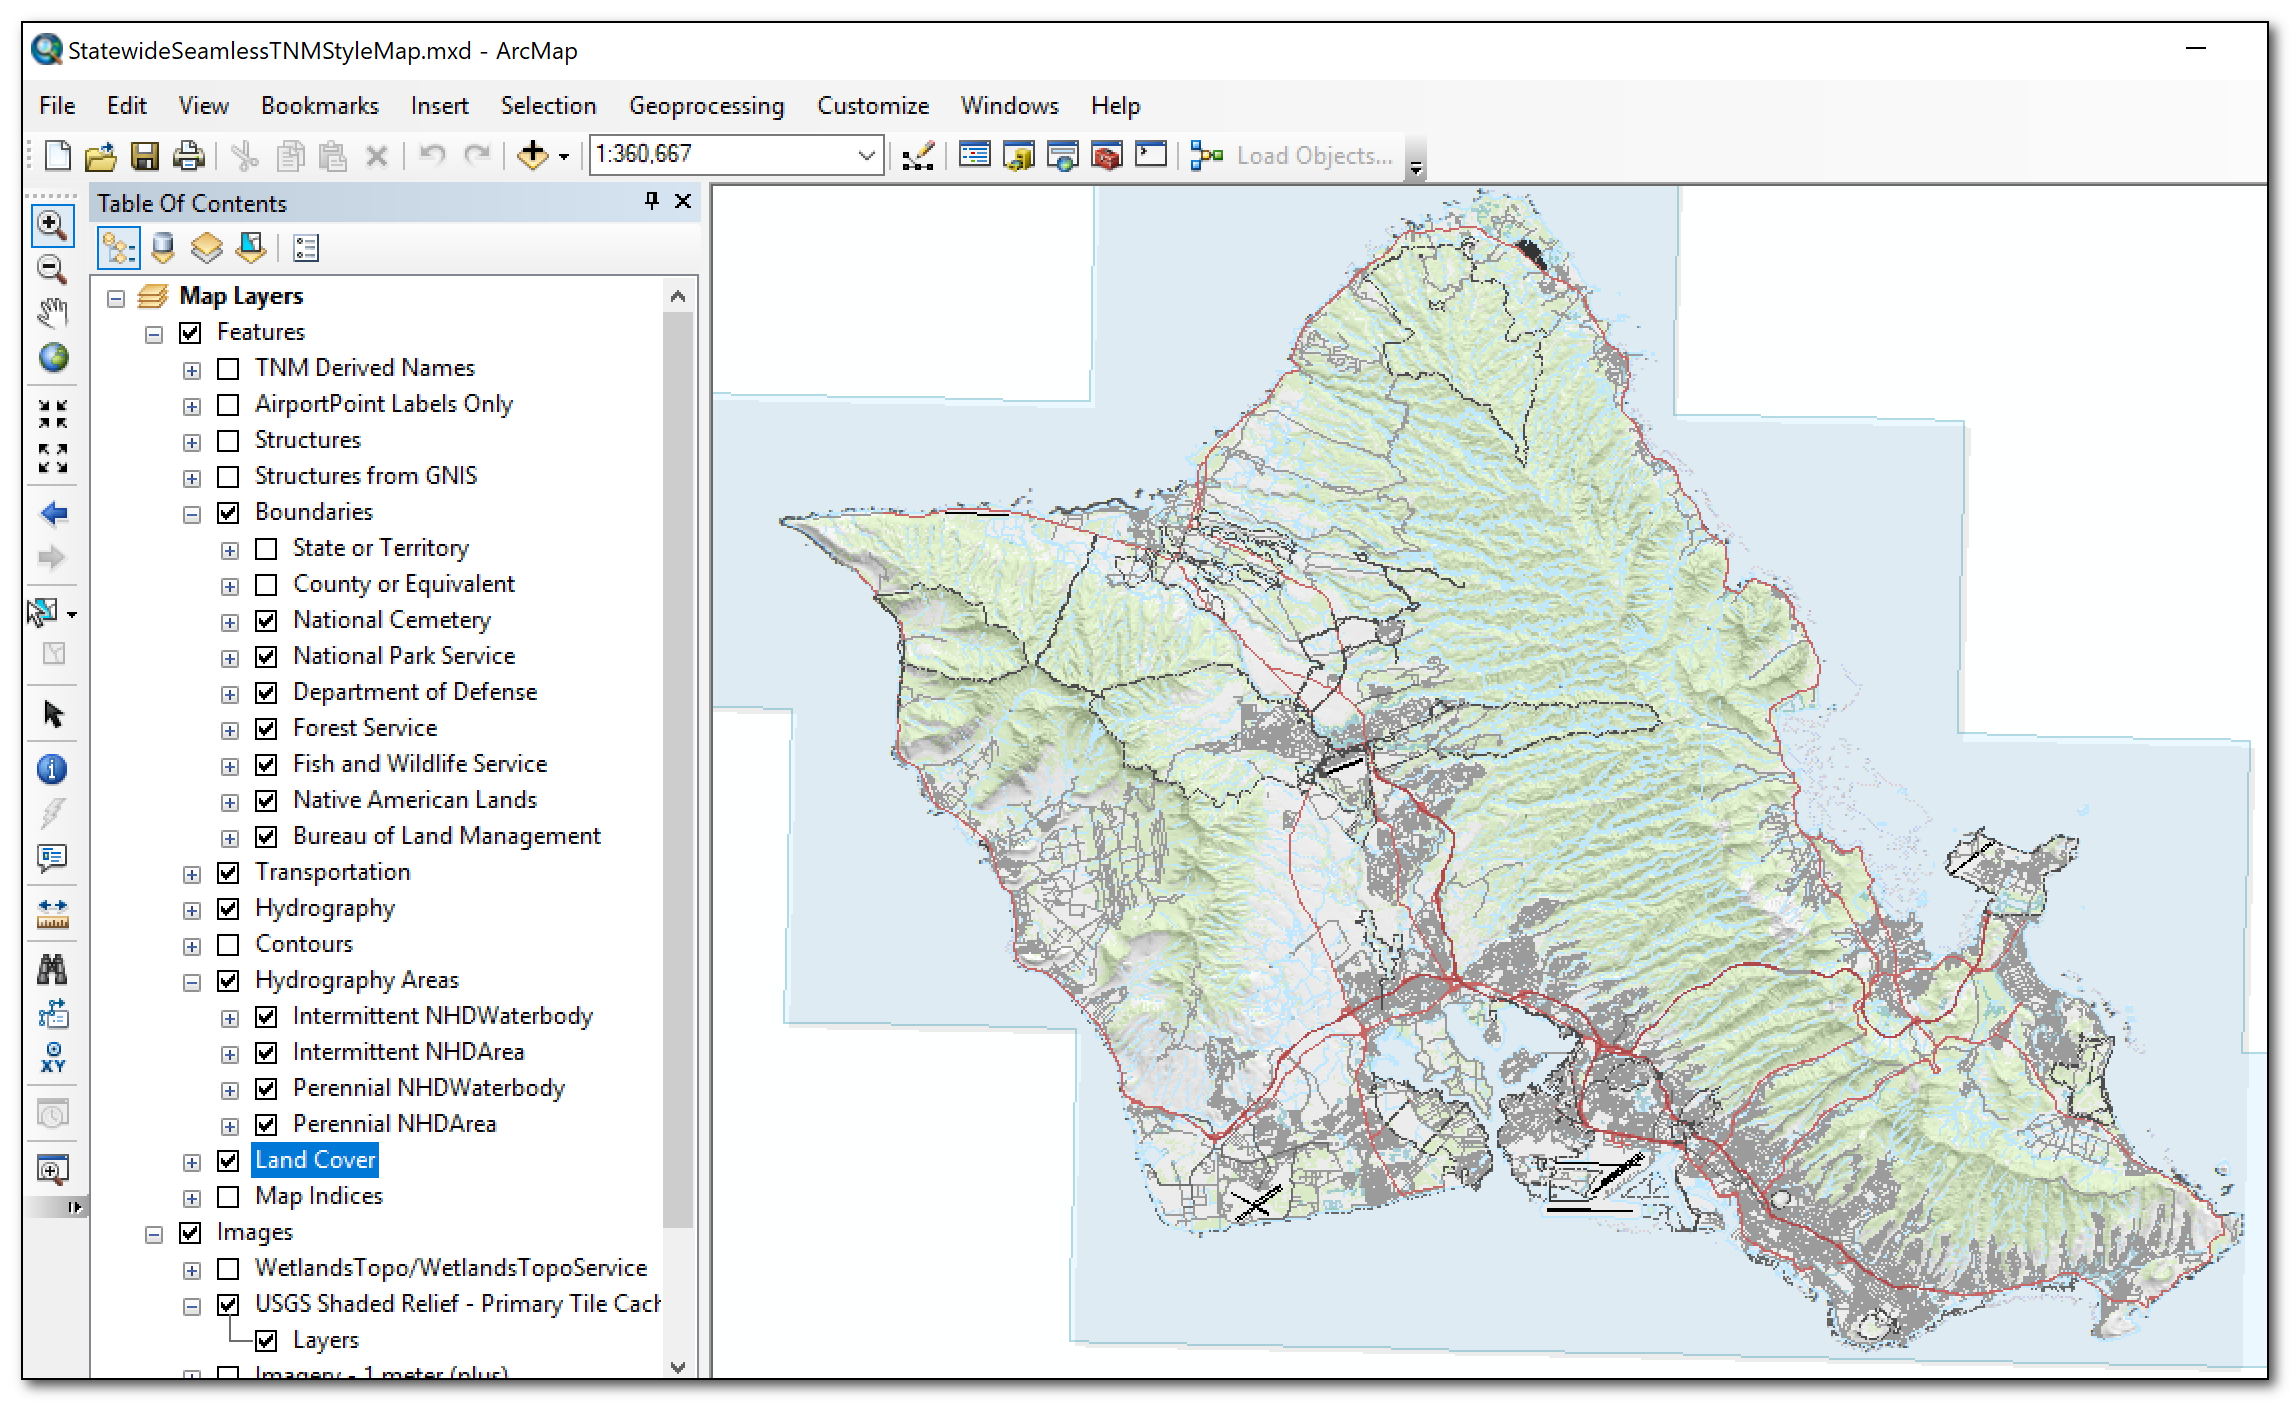
Example showing a "seamless" TNM Style map -- very similar to the USGS topo quad maps
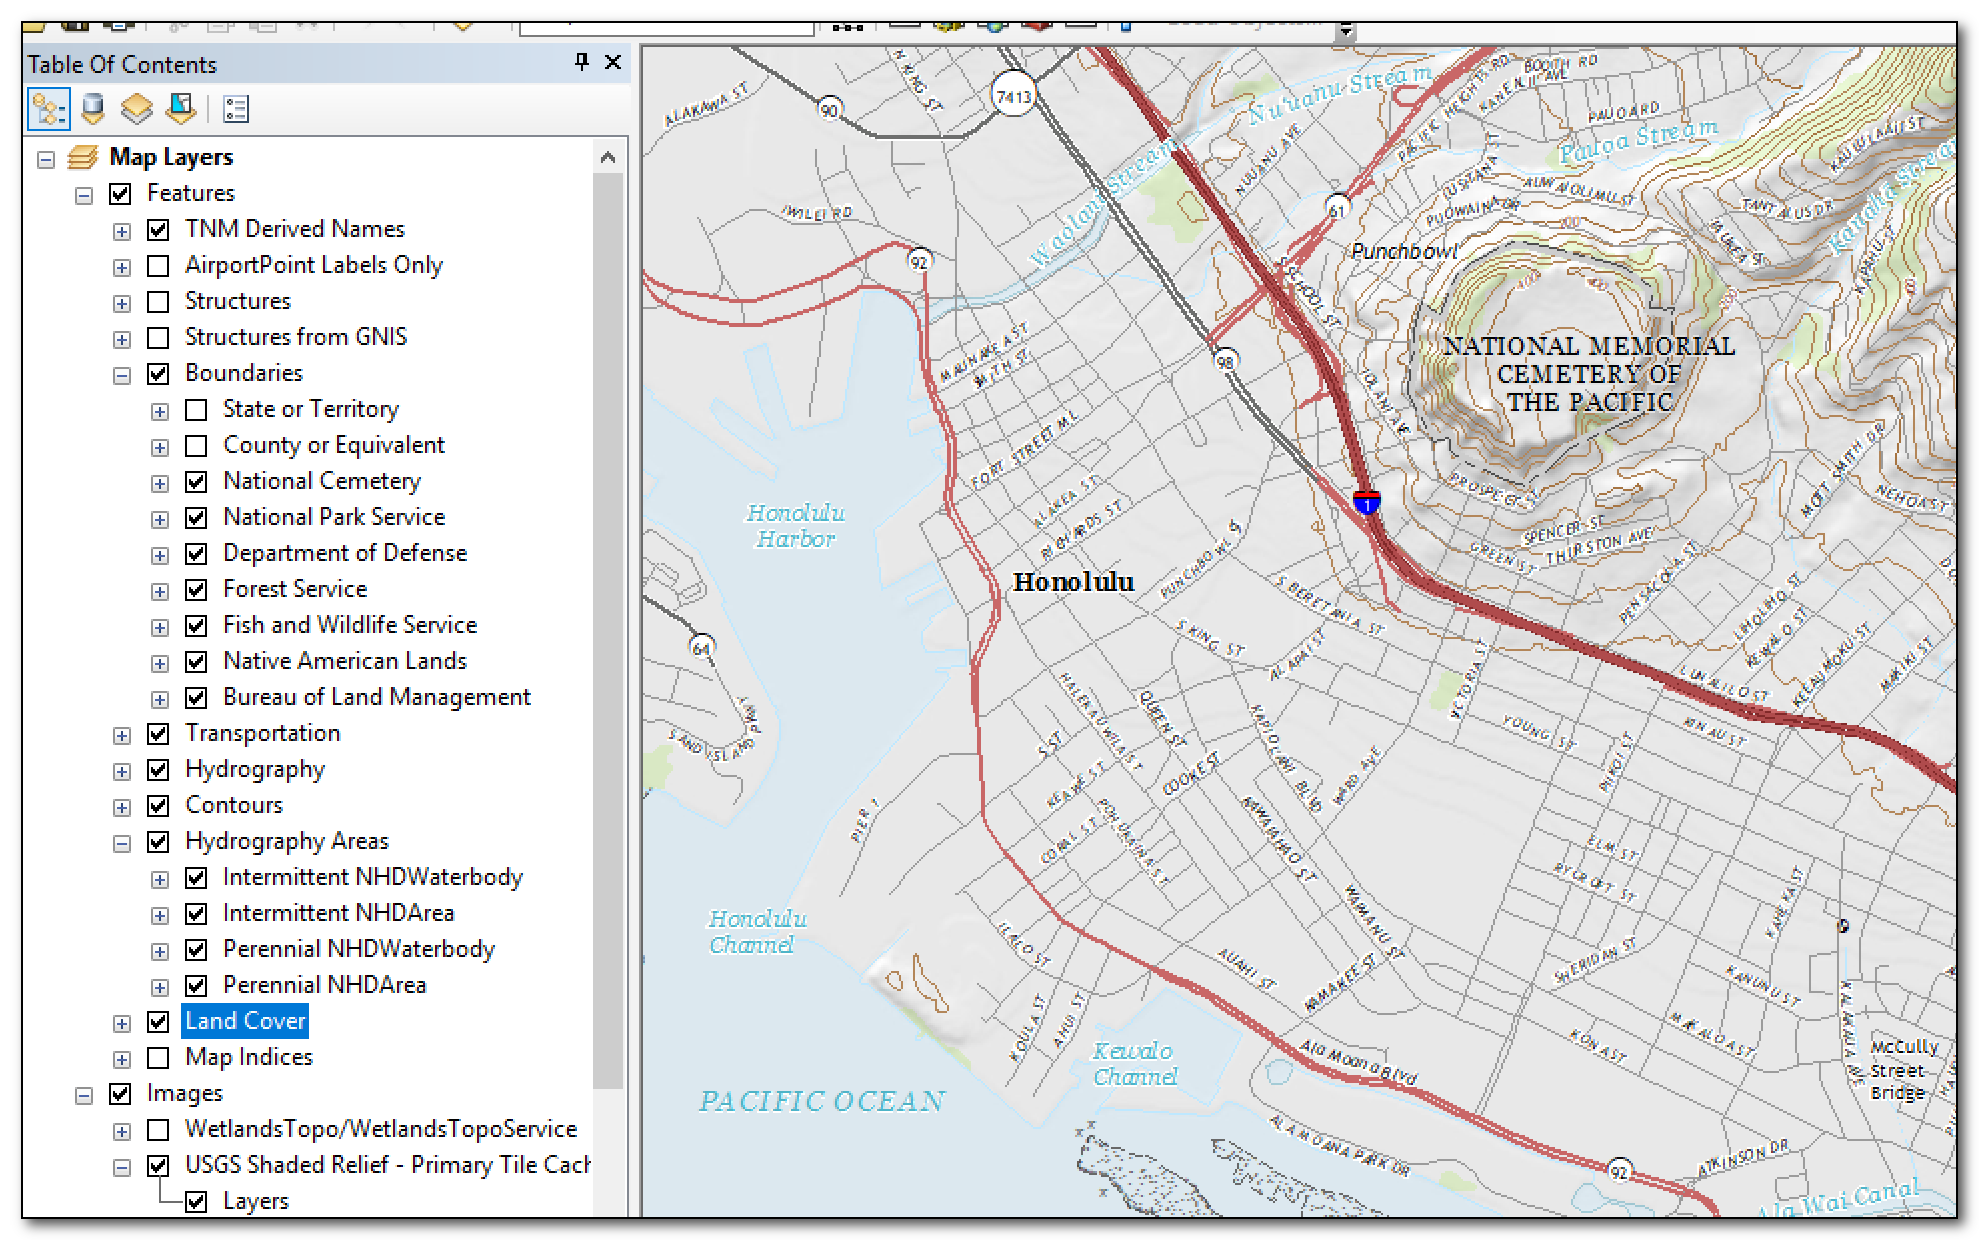
Another example showing a more close up view with no modifications of labels or symbology - note since this is all vector data (with exception of web services) everything looks sharp and can be modified as needed.